No-Bake Chocolate Cherry Lush: Layered Dessert Recipe
No-Bake Chocolate Cherry Lush: The Ultimate Layered Dessert Recipe
When I first tasted a chocolate cherry lush at a family potluck, I was hooked instantly. The rich layers, the creamy filling, and the perfect pairing of chocolate and cherry made it unforgettable. I’ve since made this dessert countless times for holidays, parties, and sometimes just because. What I love most is how incredibly easy it is to prepare—and the fact that it’s a no-bake dessert makes it even better.
[ingredientes_receta]Let me show you exactly how to make this layered dessert masterpiece and answer every question you might have along the way.

What Are the Key Ingredients for This Chocolate Cherry Lush?
The star of this recipe is the perfect balance between chocolate and cherry, built layer by layer into a creamy, no-bake delight. Here’s what you’ll need:
Essential Ingredients for the Layered Dessert
- ✅ 1 cup all-purpose flour
- ✅ 1/2 cup crushed pecans (or your favorite nut)
- ✅ 1/4 cup sugar
- ✅ 8 tbsp melted salted butter
- ✅ 1 can (21 oz) cherry pie filling
- ✅ 8 oz cream cheese, softened
- ✅ 1 cup powdered sugar
- ✅ 1 container (8 oz) Cool Whip, divided
- ✅ 2 packages (6.8 oz) chocolate pudding mix
- ✅ 3 cups cold milk
- ✅ Chocolate shavings or chocolate sprinkles for topping

🍒 Chef’s Tip: Want an extra punch of cherry flavor? Add a splash of cherry extract to your pudding mix!
Understanding the Chocolate and Cherry Flavor Combination
There’s a reason chocolate and cherry are such a classic combo. The tart, juicy brightness of cherries cuts through the richness of chocolate, creating a balanced flavor that’s both bold and indulgent.
🍫 Pro Advice: Think of it as a twist on Black Forest Cake but in creamy, cool layers.
Where to Find Cherry Pie Filling and Chocolate Pudding
You can find cherry pie filling and chocolate pudding mix at any major grocery store in the baking aisle. For a richer flavor, look for high-quality brands without added high fructose corn syrup.
🔥 Quick Tip: Organic or premium cherry pie filling tends to have whole cherries and better texture.
How to Prepare the Layers in Your No-Bake Dessert?

Creating the Perfect Crust for Your Layered Dessert
Start by combining flour, crushed pecans, sugar, and melted butter. Press the crust mixture into the prepared baking dish and place it in the oven at 375°F for 10 minutes.

🌰 Expert Trick: You can use oreo cookie crust or graham crackers if you want a totally no-bake version.
Let the crust cool completely before moving to the next layer.

Layering Cool Whip and Cream Cheese Mixture
In a medium bowl, beat the cream cheese with a hand mixer until smooth and fluffy. Add in Cool Whip and gradually blend in the powdered sugar.

Spread this cream cheese mixture evenly over the cooled crust.
🥄 Pro Tip: Make sure the mixture is smooth and fluffy to ensure an even texture throughout.
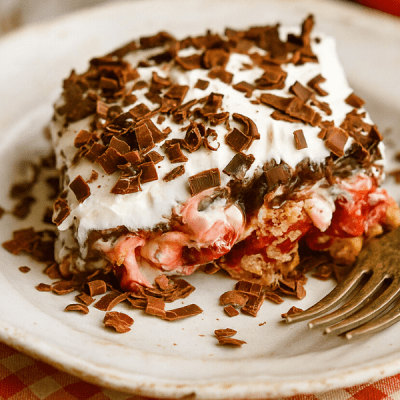
Assembling the Final Chocolate Cherry Lush Layers
- Spread the cherry pie filling evenly over the cream cheese layer.
- Prepare the chocolate pudding with cold milk according to the package instruction, then layer it on top.

- Add the remaining Cool Whip as the final layer.
- Garnish with chocolate shavings, chocolate sprinkles, or even pipe swirls on top.

🎉 Chef’s Tip: For a festive twist, top with maraschino cherries or chopped chocolate chips.
Can I Make Ingredient Substitutions Without Affecting the Dessert?
Exploring Different Chocolate and Cherry Options
You can swap the pudding for vanilla, white chocolate, or even a layer of chocolate cheesecake filling.
🍒 Pro Advice: Use fresh pitted cherries or frozen ones in place of pie filling for a rustic, chunky version.
Substituting Cream Cheese and Whipped Topping
Dairy-free? Use vegan cream cheese and whipped topping. Want it lighter? Try lite Cool Whip and Neufchâtel cheese.
🥶 Quick Tip: Chocolate Cherry Lush Make sure your substitute ingredients are slightly frozen when blending to maintain the structure of each layer.

Going No-Bake: Alternatives to Traditional Crust
Instead of a baked base, try pressing crushed oreos with butter into the dish and refrigerating it. It’s fast and truly no-bake.
🧁 Chef’s Tip: Want a fruity touch? Mix crushed graham crackers with cocoa powder and coconut flakes!
How to Get the Best Flavor and Texture?
Tips for Mixing and Beating the Ingredients
Use cold utensils and chilled bowls when mixing. Beat your cream cheese until airy before combining with Cool Whip and powdered sugar.
🌀 Pro Tip: Don’t overmix pudding or it may lose its structure.
Ensuring Your Cherry Pie Filling is Spread Evenly
Use a spatula to carefully spread the cherry filling across the layer evenly, especially toward the edges.
🍒 Expert Tip: If your filling is too thick, warm slightly to make spreading easier.
The Importance of Letting the Dessert Chill
Always chill the dish for at least 4 hours before serving. Overnight is best.
❄️ Quick Tip: Cover with plastic wrap to prevent drying and preserve flavor.
What Tips Ensure a Perfect Layered Dessert Every Time?

Making the Dessert Ahead of Time for Best Results
You can absolutely make this recipe ahead of time—even 2 days before! Just store in an airtight container.
⏳ Chef’s Tip: Add toppings right before serving to maintain freshness.
How to Freeze and Thaw Properly
Place it in the freezer uncovered for 1 hour, then cover tightly. To serve, thaw in the refrigerator for 6–8 hours.
🥶 Expert Tip: Don’t microwave to thaw—it alters the creamy texture!
Creating a Beautiful Topping and Garnish
Use whipped cream swirls, chocolate chips, or even crushed oreos for that wow factor.
✨ Pro Tip: Sprinkle cocoa powder over a heart-shaped stencil for Valentine’s Day flair!
🍒 Flavor-Stacked Perfection: Bake Chocolate Cherry Lush at Its Best
This baked chocolate cherry dessert is easy to make, full of flavor, and perfect for gatherings. Start by using a food processor to finely crush Oreo cookies—repeat for extra smooth texture. Add melted butter and press the crust into your dish. Yes, again—more butter, more pressing, more delicious base.
In a separate bowl, blend Cool Whip with powdered sugar and vanilla extract. Then fold in even more Cool Whip, a second helping of sugar, and a touch more vanilla. For that signature richness, finish with another swirl of Cool Whip and one final dash of vanilla extract. Don’t forget a sprinkle of crushed cookie on top for texture.
Chill between layers—for structure, for shape, for that clean slice. As you prep each new layer, pause to decorate, then chill again. It’s not a lasagna, but it’s layered, rich, and unforgettable.
💡 Pro Tip: Finish with a dash of peppermint and store in the fridge before serving!
FAQs About Chocolate Cherry Lush
Q1: Can I use homemade cherry pie filling instead of canned? Yes! It adds freshness and lets you control sweetness.
Q2: Is this dessert gluten-free? Not as written, but you can use gluten-free flour and cookies.
Q3: Can I skip the pudding layer? Sure! It will just be slightly less rich but still delicious.
Q4: Can I double the recipe for a larger crowd? Yes! Use a larger baking dish or two pans.
Q5: What’s the best way to store leftovers? In an airtight container in the fridge up to 5 days.
Q6: Can I make it in individual cups? Absolutely. Layer it in jars or cups for parties!
Q7: Can I use strawberries instead of cherries? Yes. It changes the flavor but works wonderfully.
Q8: What if I don’t have Cool Whip? Use stabilized whipped cream or a dairy-free whipped topping.
Q9: Can kids help with this recipe? Totally! No stove required, so it’s a great family project.
Q10: Can I toast the crust for more flavor? Definitely! Toasting nuts or the crust enhances the base.
Conclusion
This chocolate cherry lush is hands down one of the easiest, most delicious no-bake treats you’ll ever make. Whether you’re celebrating a holiday, throwing a party, or just treating yourself on a busy day, this layered dessert delivers rich flavor, perfect texture, and that nostalgic combo of cherry and chocolate we all adore.
Give it a try, snap a photo, and tag your creation—because dessert this good deserves to be shared! 🍒🍫
If you loved this Chocolate Cherry Layered Dessert, you’ll definitely want to explore more irresistible treats! Try our smooth and creamy Easy Tiramisu or the comforting layers of our Banana Pudding Recipe. For something unique and eye-catching, don’t miss the crunchy-sweet Tanghulu or our melt-in-your-mouth Strawberry Cheesecake Cinnamon Rolls. Craving something nostalgic? Bake our Old-Fashioned Custard Pie or the rich and creamy Old-Fashioned Banana Pudding. And for party-perfect options, check out our indulgent Ice Cream Cake Recipe, the iconic Dubai Chocolate Bar, or our sweet and nutty Kentucky Derby Pie. Don’t forget to bake a batch of Pistachio Pudding Cookies for a crowd-pleasing cookie tray. Explore all our delicious dessert recipes here.
Dessert history

No-Bake Chocolate Cherry Lush
Equipment
- 9x13-inch baking dish
- Medium mixing bowl
- Hand mixer or stand mixer
- Spatula
- Measuring cups and spoons
- Food processor (optional if using Oreo crust)
- Plastic wrap or cover
Ingredients
- For the crust
- 1 cup all-purpose flour
- 1/2 cup crushed pecans or preferred nuts
- 1/4 cup sugar
- 8 tbsp 1 stick salted butter, melted
- Layers
- 1 can 21 oz cherry pie filling
- 8 oz cream cheese softened
- 1 cup powdered sugar
- 1 container 8 oz Cool Whip, divided
- 2 packages 3.4 oz each instant chocolate pudding mix
- 3 cups cold milk
- Optional toppings
- Chocolate shavings or sprinkles
- Maraschino cherries
- Crushed Oreo cookies
- Mini chocolate chips
Instructions
- Preheat oven to 375°F (190°C).
- In a medium bowl, combine flour, sugar, pecans, and melted butter.

- Press the mixture into a 9x13 inch baking dish. Bake for 10 minutes, then let cool completely.

- In another bowl, beat softened cream cheese until smooth. Add in half of the Cool Whip and powdered sugar. Mix until fluffy and creamy.
- Spread the cream cheese mixture evenly over the cooled crust.

- Layer cherry pie filling over the cream cheese layer.

- Prepare chocolate pudding with cold milk according to package instructions. Spread pudding over the cherry layer.

- Top with remaining Cool Whip.
- Garnish with chocolate shavings, sprinkles, or cherries as desired.

Notes
💡 Chef’s Tips
- Add a splash of vanilla extract to the cream layer for added depth.
- Use slightly frozen Cool Whip to help maintain structure.
- Make it up to 2 days ahead and keep covered in the fridge.
- Chill between each layer to keep them firm and distinct.
🔁 Variations
- Swap cherry pie filling for strawberries, raspberries, or blueberry pie filling.
- Use vanilla, white chocolate, or cheesecake pudding instead of chocolate.
- Add peppermint extract for a holiday-inspired version.
- Serve in dessert cups for individual portions at parties.
Nutrition
Nutrition Disclaimer
The Chef Marcy is not a dietician or nutritionist, and any nutritional information shared is an estimate. If calorie count and other nutritional values are important to you, we recommend running the ingredients through whichever online nutritional calculator you prefer. Calories can vary quite a bit depending on which brands were used.


