PB and Chocolate Explosion Pancakes
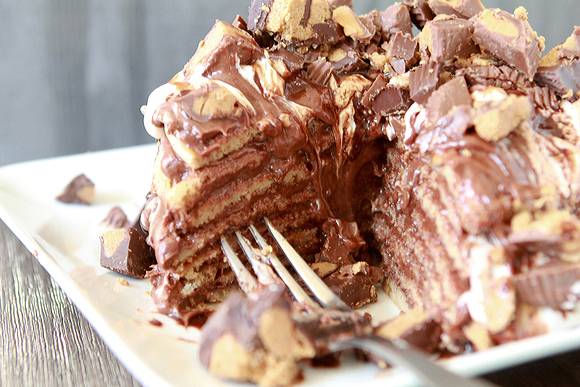
Helloooo Gorgeous! If you aren’t in the habit of talking to your food, you will be after making these inexplicably decadent fudgy PB pancakes!
These ooey gooey ‘cakes are a super fun way to serve up some sweet somethings without ever turning on your oven. Here’s how to make it with a box of Bisquick, a bit of frosting, and an insane amount of peanut butter and chocolate goodness!
First things first! Nab yourself a can of Betty Crocker chocolate frosting. Whip it together with some peanut butter and a bit of milk to make it smooth.
Next up, stir up a batch of Bisquick pancakes – but dilute the Bisquick mix to make an ultra-thin batter with milk. Cook them on a hot skillet.
The second you pull those hot ‘cakes from the skillet, spread your frosting right on top. Keep cooking ’em up ‘til they’re all made.
Stake ‘em all cake-style for a presentation that’ll knock everyone’s socks off! Take your “cake” over the top with a drizzle of these Marshmallow Brownie Toppers. Don’t resist the urge to lick your fingers. Just do it.
A hearty sprinkling of chopped peanut butter cup candies, and an hour in the fridge will finish it off. Now, ok, if you haven’t already figured it out, this is definitely a dessert and not breakfast – unless you’re totes into that sort of thing!

Peanut Butter & Chocolate Explosion Pancakes
Ingredients
- 2 cups Bisquick
- 2 1/4 cups milk
- 1 tablespoons vanilla
- 1 can Betty Crocker chocolate frosting
- 3/4 cup creamy peanut butter
- 2 tablespoons instant mocha powder
- 3 tablespoons chocolate ice cream syrup
- 1 pouch Betty Crocker Brownie Toppers, marshmallow flavor (optional)
- 8 cups chocolate covered peanut butter cups
Directions
- In a blender, combine the Bisquick, 2 cups of the milk, and vanilla. Heat a large, nonstick pan over medium heat.
- In a stand mixer, beat together the Betty Crocker chocolate frosting, peanut butter, remaining 1/4-cup milk, and instant mocha flavoring.
- Slice and enjoy!


