Advertisement
The holiday season is upon us and it’s time to get baking!
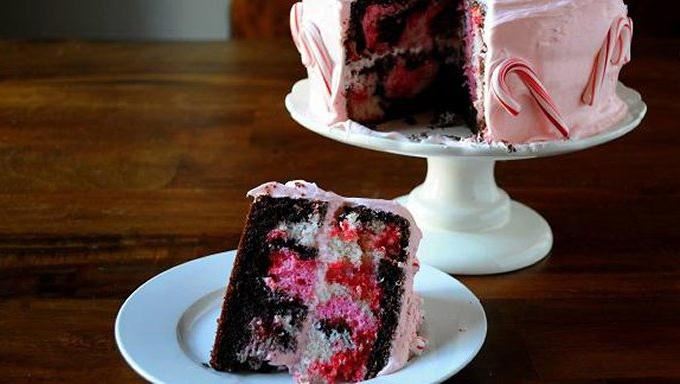
My Chocolate Peppermint Stick Marshmallow Fantasy Cake was a big hit, so I thought it would be fun to recreate it – but in a much simpler way, using Betty Crocker products. As you can see this cake is festive, whimsical, and totally fun to serve at a holiday party. We love to make it every year while we watch classic holiday movies! To make it:
- Prepare both cake mixes according to the box directions.
- Add 1 1/2 cups pink peppermint baking chips to the prepared white cake mix. Fold until fully incorporated.
- In a medium bowl, add two cups of the white cake batter. Add a couple drops of pink food coloring and mix until the batter has turned pink.
- Pour one cup of chocolate cake batter into a prepared (with baking spray) 8-inch cake pan. Do the same to the other cake pan.
- Add one cup of white cake batter into the pan – but not where the chocolate cake is. Do this in both pans.
- Add 1/2 cup of the pink cake batter into the pan over either the white or chocolate batter. Do this in both pans.
- Keep repeating chocolate, white, then pink in each pan until you run out of batter. Just make sure you have equal amount of batter in each pan.
- Bake at 350ºF for about 40 minutes (time will vary depending on your oven).
- Using a serrated knife, remove the rounded top of the cake so that you have a flat surface to work with. Do this to both cake rounds.
- You should have a flat surface and see the neat marbling effect of the cake.
- In a large bowl add the frosting, marshmallow fluff and a couple drops of pink food coloring.
- Mix until fully incorporated and smooth.
- Place the cake on a plate or cake turntable. Add frosting to the first layer and frost all the way to the edges.
- Place the second layer on top of the frosted bottom layer.
- Frost a thin “crumb coat” around the whole cake. Crumb coating is a very thin layer of icing that will “glue” any crumbs down. Place in fridge for about 15 minutes.
- Frost the cake with the remaining frosting.
- Carefully transfer frosted cake to a cake stand. If you frosted it on a plate and want to keep it on there, skip this step.
- Add mini candy canes to the sides of the cake in any pattern you want.
- As a final touch, add crushed candy cane pieces to the top of the cake.
- Grab a fork and enjoy a slice of festive, pepperminty, marshmallowy goodness!
Peppermint Marshmallow Cake
Ingredients
- 1 box Betty Crocker Chocolate Cake Mix
- 3 large eggs
- 1 1/4 cups water
- 1/2 cup vegetable oil
- 1 box Betty Crocker White Cake Mix
- 3 large egg whites
- 1 1/4 cups water
- 1/2 cup vegetable oil
- 1 1/2 cups pink peppermint baking chips
- 2 cans Betty Crocker Vanilla Frosting
- 1 7oz jar marshmallow fluff
- 1 bottle pink food coloring
- 15 mini candy canes
Directions
- Prepare both cake mixes according to the box directions.
- Add 1 ½ cups pink peppermint baking chips to the prepared white cake mix. Fold until fully incorporated.
- In a medium bowl add two cups of the white cake batter. Add a couple drops of pink food coloring and mix until the batter has turned pink.
- Pour one cup of chocolate cake batter into a prepared (with baking spray) 8-inch cake pan. Do the same to the other cake pan.
- Add one cup of white cake batter into the pan but not where the chocolate cake is. Do this in both pans.
- Add ½ cup of the pink cake batter into the pan over either the white or chocolate batter. Do this in both pans.
- Keep repeating chocolate, white, then pink in each pan until you run out of batter. Just make sure you have equal amount of batter in each pan.
- Bake at 350F for about 40 minutes (time will depend on your oven as each one cooks differently.
- Using a serrated knife, remove the rounded top of the cake so that you have a flat surface to work with. Do this to both cake rounds.
- You should have a flat surface and you can see the neat marbling effect of the cake.
- In a large bowl add the frosting, marshmallow fluff and a couple drops of pink food coloring.
- Mix until fully incorporated and smooth.
- Place the cake on a plate or cake turntable. Add frosting to the first layer and frost all the way to the edges.
- Place the second layer on top of the frosted bottom layer.
- Frost a thin “crumb” coat around the whole cake. Crumb coating is a very thin layer of icing that will “glue” any crumbs down. Place in fridge for about 15 minutes.
- Frost the cake with the remaining frosting.
- Carefully transfer frosted cake to a cake stand. If you frosted it on a plate and want to keep it on there then skip this step.
- Add mini candy canes to the sides of the cake in any pattern you would like.
- As a final touch, add crushed candy cane pieces to the top of the cake.
Recipe and Photo credit:tablespoon / CC BY-NC-ND
Advertisement
Advertisement


